WELCOME

**PLEASE GO TO MY NEW BLOG AT**

Sunday, October 14, 2012

FREE KNIT PATTERN - BASIC KNIT RIB SCARF

JANET MARIE'S BASIC KNIT RIB SCARF
designed and created by Janet Marie Marston-McGregor
posted on 10/14/2012

Please do not sell this pattern - you may sell what you make, share the pattern and/or post back to this site.

size will be approx 7-8 feet long by 3.5 inches wide without fringe (by using nylon, it stretches to double the size)

Items you will need:
--approx 200 yds of 50% nylon / 50% acrylic yarn (or other yarn if you desire)
--size 8 needles (I used circulars)
--size H crochet hook (to weave in ends)
--scissors

NOTE - I knit and crochet tight, so you may want to use size 7 or 6 needles
__________________________________________________
CAST ON 26. 
KNIT 3 ROWS for border.  
ROW 1 = K2, P2
ROW 2 = P2, K2  
REPEAT ROWS 1 and 2 till desired length, then KNIT 3 ROWS for border, then BIND OFF - leave enough yarn for fringe
(TIP = I like to cut my fringe strings off before I start knitting, that way, I will can just knit till I run out of yarn)  

FRINGE: cut 14 sets of 3 strands as long as you want - I cut mine approximately 12 inches long - then put 7 sets of 3 on each end of the scarf


FREE KNIT PATTERN - ALPACA BASKETWEAVE SCARF

JANET MARIE'S KNIT ALPACA BASKETWEAVE SCARF
designed and created by Janet Marie Marston-McGregor
posted on 10/14/2012


Please do not sell this pattern - you may sell what you make, share the pattern and/or post back to this site.


size will be approx 6-7 feet long by 5.5 inches wide without fringe


Items you will need: --approx 200 yds of 3-ply fingering alpaca yarn (or other yarn if you desire)
--size 8 needles (I used circulars)
--size H crochet hook (to weave in ends)
--scissors

NOTE - I knit and crochet tight, so you may want to use size 7 or 6 needles

__________________________________________________

Cast on 27 (for multiples of 3 plus 6 for the trim)

KNIT first 4 rows and last4 rows for trim on each end (I do not count these rows in the basketweave counting)

(TRIM) = KNIT first 3 and last 3 stitches of every row

KINIT 4 ROWS (for border)

ROW 1 = K3 (for trim), K3, P3 across till 3 stitches left, then K3 (for trim)
ROW 2 = K3 (for trim), P3, K3 across till 3 stitches left, then K3 (for trim)

REPEAT ROWS 1 and 2 until you have 360 basketweave rows, then K 4 rows (for border); bind off

FRINGE:
cut 18 sets of 3 strands approx 12 inches long or however long you want - use crochet hook to add 9 sets of fringe on each end of scarf.


Sunday, November 27, 2011

HOLIDAY-CHRISTMAS BEAR

I have a "rescued" teddy bear that needed an outfit - so I custom made a little knit sweater, hat/beanie/cap and crochet scarf.

Sometimes I will rescue a bear that needs a new home - especially when they have such a cute face!

Sunday, November 20, 2011

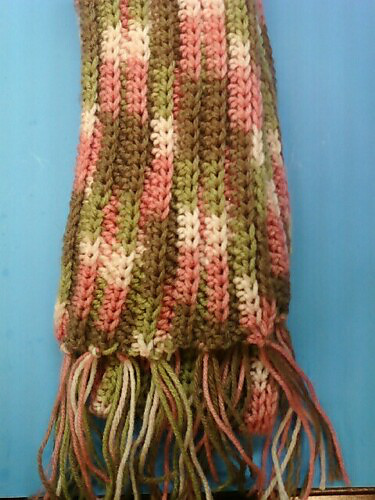
FREE CROCHET PATTERN - Ribbed Scarf

JANET MARIE'S CROCHET RIBBED SCARF
designed and created by Janet Marie Marston-McGregor
posted on 11/20/2011

I designed this scarf a few years ago - decided to post the pattern - it is very easy and makes up fairly quick.  ENJOY!

With size K hook (or whatever size you choose - I crochet tight - so I tend to use larger hooks) - CH till measures at least 5-6 feet (or longer) - no need to count unless you want to.

HDC in 3rd CH from hook - HDC across; CH2, turn
**HDC in back loops only - all the way across; CH2 turn**
REPEAT ** till desired width; fasten off

add trim of your choice - I added fringe

it's THAT EASY!


Please do not sell this pattern - you may sell what you make, share the pattern and/or post back to this site. 

This one was made with Red Heart Pink Camo yarn - any yarn will work.


This one was made using Plymouth Encore Tweed:


Thursday, November 10, 2011

FREE TUNISIAN PATTERN - Kitchen Towel-Cloth

TUNISIAN KITCHEN TOWEL-CLOTH
designed and created by Janet Marie Marston-McGregor
posted on November 10, 2011

(finished size is about 13x16.5)

I used 100% cotton Lily Sugar and Cream yarn for this project - works great for kitchens - very absorbent - and the tunisian crochet-knit stitch is very dense - can also be used for potholder.

You will need size K tunisian hook and at least 1 skein of each color you choose - I used cones, so if you use the small cotton skeins, get 2 of each color, just in case.

NOTE - Tunisian tends to curl - by beginning with a few SC rows will help your towel to NOT curl - PLUS, if you still see you are curling too much - go back and use a larger hook, like L

ALSO - stop every few rows and pull and shape your piece - will also help with curling

With size K (or L) tunisian hook, CH31

(WHITE)
ROW 1 - SC in next CH, SC across (30 CH)

(RED)
next 4 ROWS - TC

(WHITE)
next 2 ROWS - TC

repeat till you have 8 rows of RED and 7 rows of white - will END with a RED row

(WHITE) next ROW - SC across; CH1, turn
When you are starting your SC rows, go down to the bottom of the last TC stitch - you will avoid having holes - if you have questions - feel free to email me and I will try to help.

TRIM:
*SC around towel, with corners being (2SC, CH1, 2SC) - if this is too loose; join; CH1*, turn
REPEAT SC around towel again - if you want more rounds, repeat till don; join and fasten off

Please do not sell this pattern - you may use it (sell what you make), share it with others - and link back to this site!   Be a blessing to others - especially in today's economy.


Tuesday, November 8, 2011

FREE CROCHET PATTERN - Adult Ribbed Scarf


ADULT CROCHET RIBBED HAT
designed and created by Janet Marie Marston-McGregor
Posted on 12/11/2011

Designed this pattern years ago - finally posting the pattern - very easy to make and goes very fast.

For this sample - I used a merino wool (gift for friend) - have also used others.

with size K hook, CH till measures at least 11-12 inches long (or longer if you want to roll it up).

HDC in 3rd CH from hook; HDC across; CH2, turn
**HDC across to end; CH2, turn**
REPEAT ** till desired width (approximately 30 rows)

before you finish - hold it around your head to make sure it is wide enough - when you are comfortable with the width - then you are ready to seam it together

do not fasten off - FOLD in half - stitch across - leave long tail (at least 12 inches) - with needle, weave through top - pull to tighten, sew through a couple of times to seam up hole - fasten off

NOTE - it's okay to be a little tight - because it will stretch out as you use it

make pompom if you want one

Please do not sell this pattern - you may use it (sell what you make), share it, and link back to this site.


Please do not sell this pattern - you may sell what you make - share it with others - and/or link back to this site.  Thank you!


Sunday, November 6, 2011

FREE KNIT PATTERN - Baby Mittens

KNIT BABY MITTENS
designed and created by Janet Marie Marston-McGregor
Posted on November 6, 2011

I designed these adorable mittens to go with my baby beanie - very easy.

I used a baby/sport weight yarn 3-4 - you can use any yarn, just adjut your needles, hooks and check your size.

Please do not sell this pattern (you may sell what you make); you may share it, or link it back to this blog.  Thank you and ENJOY!
____________________

You will need a size G crochet hook to do the border, large eye blunt needle for the ribbon,  and size 8 circular needles

(MAKE 2)
with needles, CO12
ROW 1 = K
ROW 2 = P
REPEAT ROWS 1-2 till approx 6 inches
BIND off

FOLD over with wrong side out (should be about 3 inches folded) - with G hook, SS from top down the side; fasten off; repeat to other side, but don't fasten off;

TURN INSIDE OUT
SC around cuff; join; do NOT turn; SC in back loops; join; fasten off

Take satin ribbon and weave through with large eye blunt needle right above the crocheted border; tie in bow


Friday, November 4, 2011

FREE KNIT PATTERN - Baby Hat/Cap/Beanie

KNIT BABY HAT/CAP/BEANIE
designed and created by Janet Marie Marston-McGregor
posted on 11/06/2011

you will also need size G crochet hook to go around the edge

with size 8 circulars, CO46 or till piece measures between 11-12 inches
(NOTE - depending on the yarn you choose, you may need to use smaller needles - just CO till your piece measures 11-12 inches or 5-6 folded)

(do not join rows yet) ROW 1-3 = K (gives a nice bumpy edge and will keep cap from curling)

ROW 4-END = (knit in the round) till measures between 5-6 inches - more if you want looser

BIND OFF - leave at least 12 inch tail; weave through top; pull string; tie off

Please do not sell this pattern - you may use it (and sell what you make), share it, and link back to this site.  Enjoy! 


Wednesday, November 2, 2011

FREE CROCHET PATTERN - Baby Socks/Booties

Crochet Baby Socks/Booties
designed by Janet Marie Marston-McGregor
posted on 11/01/2011


This is my own design of easy baby socks-booties.  Use baby yarn - for this pattern, I used Bucilla Lollipop yarn - but any baby yarn or sock yarn should do.

Sock-Bootie should measure 3 to 3.5-inches from toe to heel; and 6 inches from toe to top of cuff

This pattern makes a long cuff to fold down.

(CUFF)

with size F (or G) hook, CH18 
NOTE - I tend to crochet tight - you might want to try F first

ROW 1 = SC in 2nd CH from hook and all across (17 total); CH1, turn

ROW 2-22 = SC in back loops across row (17 total); CH1, turn

ROW 23 = fold in half; SS across


(HEEL) (in both loops)

ROUND 1 = SC in joining stitch and in next 9 (10 total); CH1, turn

ROUND 2-5 - SC across; CH1 turn

ROUND 6 - SC in next 3, 2SC togther (twice);  FOLD in half, SS across (4)

(FOOT)

ROUND 7 - 7SC down heel; SC in next 14 (to the other side of cuff); 7SC up the other side of the cuff; join; CH1; turn

ROUND 8 - SC in next 5, 2SC together (twice); SC in next 10; 2SC together (twice); SC in next 5; join; CH2 turn

ROUND 9-13 - SC across (24); join; CH1 turn

ROUND 14 - SC in next 6, 2SC together; SC in next 6, 2SC together; SC in next 6, 2SC together; join; CH1 turn

ROUND 15 - SC in next 5, 2SC together; SC in next 5, 2SC together; SC in next 5, 2SC together; join; CH1 turn

ROUND 16 - SC in next 4, 2SC together; SC in next 4, 2SC together; SC in next 4, 2SC together; join; CH1 turn

ROUND 17 - SC in next 3, 2SC together; SC in next 2, 2SC together; SC in next 2, 2SC together; SC in last 3; join; CH1 turn

ROUND 18 - SC in next 2 2SC together; SC in next 2, 2SC together; SC in next 2, 2SC together; join; CH1 turn

ROUND 19 - 2SC together all around - join and stitch together - fasten off

TURN INSIDE OUT - FOLD DOWN CUFF

Please do not sell this pattern - you may use it (and sell what you make), share it, and link back to this site. Enjoy!


Friday, October 28, 2011

FREE KNIT PATTERN - Adult Hat-Cap-Beanie

KNIT ADULT HAT-CAP-BEANIE
designed and created by Janet Marie Marston-McGregor
posted on 10/28/2011

I went through some of my old yarn stash - found a big ball of yarn - I have no idea the brand - but pretty sure it’s Red Heart - anyway, I remember using it back in 1998 - yes, it’s that old - I remember making a gift for my gramma (now passed) and this is what’s left - making myself a knit hat/cap/beanie, and, if enough is left, will make a scarf.


Making it up as I go along - nothing fancy - just wanted to use it up and since I know I used this for my gramma, will be a “comfort” thing.

:)

I knit slower than crochet - and can’t do fancy stitches - just basic - may trim in crochet.
Knitting in the round - for me, it’s the easiest way to get that knit/pearl look without trying to count - I am really bad at that - what i like about knitting in the round is you get knit on one side and pearl on the other - and don’t have to remember to switch and do it backwards.
________________________________________

With size 8 circulars, cast on 80 (why 80? just seemed to be the right size for my head)

K all around till desired length - I want it to cover my ears - leave long tail - weave through, pull tight - sew it up (optional); tie it off; make a pompom

Knitting in the round - for me, it’s the easiest way to get that knit/pearl look without trying to count - I am really bad at that - what i like about knitting in the round is you get knit on one side and pearl on the other - and don’t have to remember to switch and do it backwards


For the TRIM, I did 4 rows of SC (in back loops) with size G hook - added a nice big fluffy pompom - made it long enough to fit over my ears

Please do not sell this pattern - you may use it (and sell what you make), share it, and link back to this site. Enjoy!


________________________________________


10/23/2011 - BEGIN
10/24/2011 - I think I may finish this today - just in time for our snowstorm!
10/26/2011 - FINISHED!


Search This Blog